Barre chords for beginner guitarists.
Thumbs up! L.H.
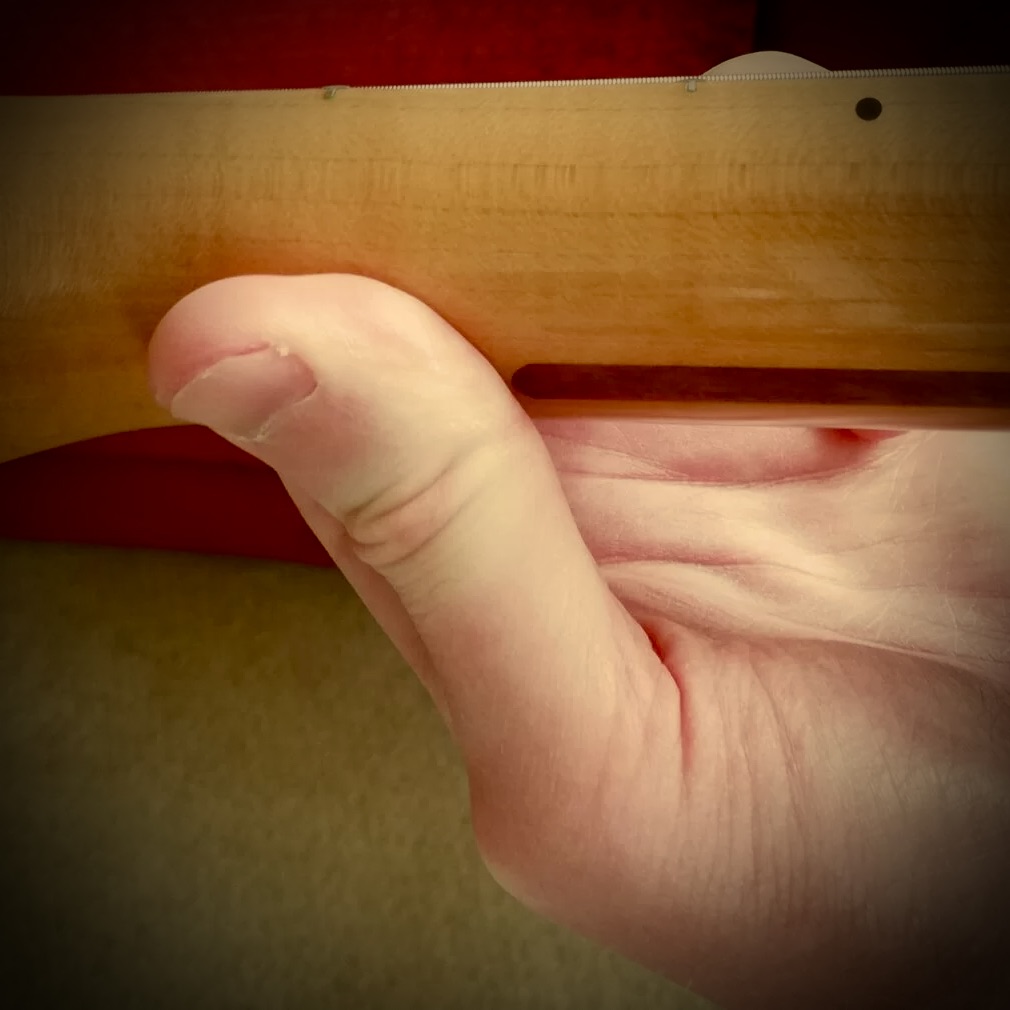
👍 Thumbs Up! – L.H.
What makes your barre chords sound clean often comes down to the position of your left-hand thumb and first finger.
Your first finger should lie straight across the fret, and your thumb should sit along the back of the guitar neck, forming almost an ‘L’ shape with your hand. The exact position may vary depending on your hand size.
From here, you can stretch fingers 2, 3, and 4 into place.
If you’re not sure how to read a chord chart here’s an example.
How to Read a Chord Chart
If you’re unsure how to read a chord chart, here’s a quick guide:
Labels like F1, F2, etc., indicate which fret to place your fingers on.
An X above a string means do not play that string.
Numbers 6 to 1 represent the guitar strings from low E (6th) to high E (1st) — in order: E, A, D, G, B, E.
Circled numbers on the diagram show which fingers (1 to 4) to use.
If a string number is circled, it means you play that string open (without pressing a fret).

What are Barre chords?
Barre chords is a technique where the guitarist can typically use either their first or third finger to cover between strings two or six.
Here is an image of a ‘Full F Major barre chord’ covering strings six to one from fret one.
Root notes & positions
Moving Barre Chords Around the Fretboard
Barre chords allow guitarists to move the same chord shape to different positions on the fretboard, while maintaining the same chord type.
For example, if you play a barre chord on fret one, it’s an F major. Shift the same shape up to fret two, and it becomes F♯ (or G♭) major.
To preserve the chord type (e.g. major, minor), you simply move the same shape to a new root note or starting note.
The root note of a barre chord is typically found on string 6, 5, or 4, depending on the chord shape. It’s usually played using finger 1, 3, or 4, depending on the position and shape you’re using.
Where to start with Barre chords?
There are a couple of ways to approach barre chords, but it’s important to be comfortable with open chords first.
A good starting point is to fret strings 6 to 3 using your fingertips, just as you normally would for a power chord. Then, carefully add the barre by pressing your first finger flat across the fretboard while adjusting your thumb into the ‘L’ shape position behind the neck.
This positioning provides the necessary leverage and support for a clean sound.
Getting Started with Barre Chords (recap)
The F major chord is often the first barre chord most guitarists learn.Begin by practising both the half-barre and full-barre versions.To start off, try forming the chord using just fingers 1 and 2.
Tips for Playing Barre Chords
Push your wrist forward slightly — this creates space and adds pressure from the palm for a cleaner sound.
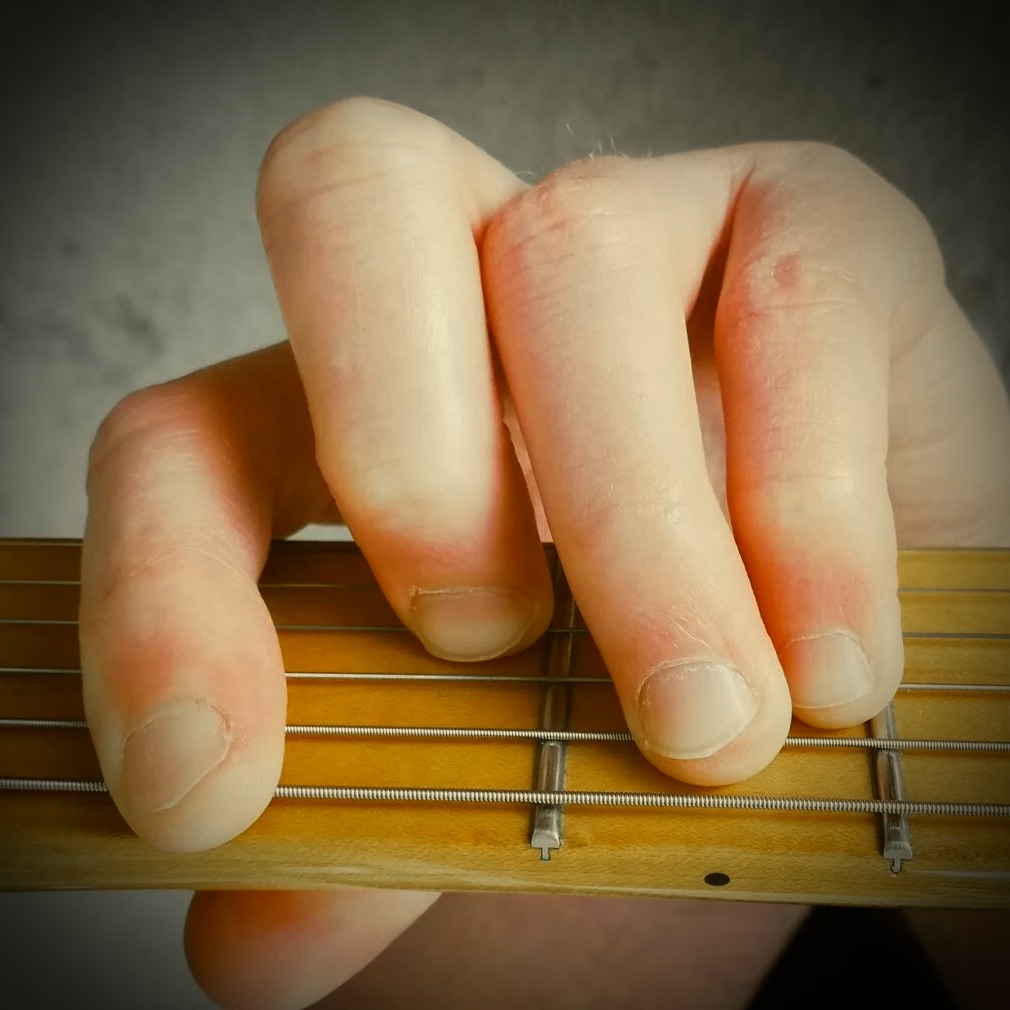
Push in the knuckle of your first finger to help it lie flat across the strings.
Place finger 2 so its knuckle sits comfortably over the top of finger 1.
Add finger 3 in the correct position, allowing it to stretch naturally.
Lower your thumb behind the neck to increase your reach and control.
Notice how the first finger’s knuckle is pushed in whilst the knuckle of finger two is arched over the top.
Once this feels comfortable, introduce finger three. Make sure the thumb is behind the neck in the thumbs up position.
The lower your thumb is the more you can stretch.
For beginner guitarists, there are two primary types of barre chords:
- Full barre chords, which cover strings 6 to 1
- Partial barre chords, which typically cover just strings 1 and 2
As shown in the images below, both of these are used to play major chord shapes.
These shapes are incredibly useful, as they allow you to play all major chords anywhere on the fretboard by simply moving the shape to a new position.

The second is by covering all six strings with finger one,
Notice how the notes on strings 6 5 & 4 is the power chord or 5th chord. Add finger 2 into position. This will be the first stage. The second is keeping these fingers in position whilst fretting across strings 6 – 1.
Position of the thumb and having the wrist forward (enough) will help you achieve it.
Barre chords, muted notes.
Troubleshooting: Muted or Buzzing Notes on Strings 2 and 3
If strings 2 and 3 aren’t sounding as clearly as you’d like, it may be down to finger positioning.
If string 2 isn’t ringing out properly, it could be because:
Finger 3 is slanting and unintentionally touching string 2 — try using more of the fingertip, or You’re simply not applying enough pressure.
To fix this:
Lower your thumb behind the neck
Drop your wrist forward
This adjustment creates space between the strings and your finger pads, allowing for better clarity, while also giving you more control and strength from the palm of your hand.
Major, minor, major 7th, minor 7th barre chords
Final Thoughts
Hopefully, this blog post has encouraged you to stick with learning barre chords as they can be tricky at first, but once you’ve mastered the basic shapes, you’ll unlock the ability to play a wide range of chord types in barre form.
Rather than being limited to open-position chords, you’ll be able to play them anywhere across the fretboard.
If you now feel confident with major barre chords on strings 6 to 1 and have a solid understanding of major shapes across strings 1 and 2, why not take the next step?
📩 Book an intro lesson today at: mkguitartuition.com/contact